K9 Combat Casualty Care Committee
Italicized Text indicates recommendations that are significantly different from human TCCC
CARE UNDER FIRE
- Return fire and take cover.
- Apply a muzzle to protect care providers unless respiratory distress precludes its use. Note: Injured MWDs can be unpredictable and harm other team members providing assistance.
- Recall the canine to a safe location if able and maintain positive control. Keep collars and tactical vests on to aid restraint and movement unless causing obvious harm (i.e. choking).
- Try to keep the MWD from sustaining additional wounds.
- Injured MWDs should be extricated from burning vehicles or buildings and moved to places of relative safety. Do what is necessary to stop the burning process. Remove all burning or smoldering harnesses, collars, vest, booties, goggles, and other gear. Avoid pulling away any items that are melted into the canine’s skin or hair coat; cut hair coat to free melted object.
-
Stop life-threatening extremity hemorrhage via placement of a quick application circumferential pressure bandage with hemostatic dressings, if tactically feasible.
* NOTE: CoTCCC recommended human-designed windlass limb tourniquets are generally ineffective in canines due to conformational differences; Limb tourniquets are, generally, not warranted to abate extremity hemorrhage in canines. - Airway management is generally best deferred until the Tactical Field Care phase.
- Priority for casualty care is always given to human combatant casualties before canine casualties. The handler and canine should travel together as a single unit, when appropriate and logistically feasible.
TACTICAL FIELD CARE
1. Establish a Security Perimeter
- Establish a security perimeter in accordance with unit tactical standard operating procedures and/or battle drills. Maintain tactical situational awareness.
2. Triage
- Triage casualties as required. Human casualties should always be given priority over MWD casualties.
3. Massive Hemorrhage
- Assess for unrecognized hemorrhage and control all sources of external bleeding with manual or direct pressure via application of hemostatic agents, pressure bandages and/or wound packing as first line intervention.
- Apply CoTCCC-recommended hemostatic dressings with at least 3 minutes of direct pressure (optional for XStat). Each dressing works differently, so if one fails to control bleeding, it may be removed and a fresh dressing of the same type or a different type applied. (Note: XStat is not to be removed in the field, but additional XStat, other hemostatic adjuncts, or trauma dressings may be applied over it.)
- Junctional wounds should be treated with aggressive application and packing with hemostatic, pressure dressings and direct pressure to control bleeding.
* CoTCCC recommended windlass, limb tourniquets designed for humans (e.g. C-A-T, SOFTT-W) tend to slip distally and generally fail on MWDs due to conformational differences and should not be used as first line therapy for hemorrhage control in MWDs.
* The only tourniquet that should be considered for use on a massive extremity hemorrhage in a MWD’s is a stretchable and elastic tourniquet such as the SWAT-T. This type of material allows it to mold to nearly any limb size and conformation in conjunction with its wide design, allows it to serve as an effective circumferential pressure bandage on an MWD’s limb.
*Junctional tourniquets have not been evaluated in dogs and are not recommended at this time.
4. Airway Management
Conscious MWD with no airway problems identified:
- No airway interventions needed.
Unconscious casualty WITHOUT airway obstruction:
- Place unconscious MWD in a recovery position (sternal recumbency/ prone if possible or allow MWD to remain in lateral recumbency).
- Perform basic airway maneuvers:
- Extend the head and neck into a straight in-line position;
- Grasp the tongue, gently extend out of the mouth, and pull it down over the lower jaw.
- Consider endotracheal intubation to achieve / maintain patent airway.
- Consider using a mouth gag to keep the MWD’s mouth open and prevent trauma to endotracheal tube. Examples of a field expedient mouth gag may include:
- 1 – 2 inch roll of medical tape;
- 2 inch wide roll of self-adherent bandage (Coban®/Vetrap®); or
- Cutting the end off of a 3 – 5 mL syringe tube casing and securing over the upper and lower canine teeth.
- Placing a portion of a kong between MWDs teeth to open the mouth.
Conscious MWD WITH airway obstruction or impending airway obstruction:
- Clinical Signs:
- Pawing at mouth, gagging,
- Excessive drooling,
- Frequent swallowing motions,
- Extended head and neck,
- Elbows and upper legs held out from the chest (e.g. “tripod position”),
- Reluctant to lie down,
- Noisy breathing (stertor or stridor),
- Cyanosis (bluish gums); late sign.
- Allow the MWD to assume the ‘position of comfort’ or the position that best allows the MWD to breath with minimal restriction of air flow and that protects the airway, to include sitting or standing.
- Palpate throat (pharyngeal area, larynx, and trachea to identify any abnormal mass or foreign material.
- Open mouth to examine oropharyngeal area:
- Avoid placing hands or fingers directly in MWD’s mouth.
- Consider using a leash, rope or roll gauze looped behind the upper and lower canine teeth in attempts to pry and hold the MWD’s mouth open.
- Consider sedating the MWD (see section 10 below).
- Use suction if available, appropriate and feasible based upon MWD disposition/mental status.
If attempts to clear or remove the airway obstruction have failed or the MWD collapses or becomes unconscious consider one of the following techniques:
- Orotracheal Intubation (OTI) / Endotracheal Intubation (ETI):
- Preferred first-line technique for gaining airway access in MWDs and with training this can be accomplished in field conditions.
- Use of a laryngoscope, although helpful, is not often required for MWD ETI; if available, a #4 - #5 Miller (straight) blade is recommended for MWD >25 kg (55 lbs).
- Use a 8.0 – 10.0 mm internal diameter ET tube (ETT) for MWD weighing > 25 kg (55 lb).
- ETI is considered the first-line option for advanced airway management in an unconscious or anesthetized MWDs. Canines possess a proportionally larger tracheal lumen diameter as compared to people. In order to achieve an airtight seal, it is recommended to select an ETT that is 70% of the canine’s internal tracheal lumen diameter. Digital palpation of the trachea in the cervical neck region is the most reliable method for estimating the canine’s tracheal diameter. In most MWDs a size 8.0-10.0 endotracheal tube is appropriate. To avoid the risk of one-lung intubation, determine the appropriate ET/CTT/TT length by measuring from the front or the canine incisors to the thoracic inlet or point of shoulder.
- NOTE: intubation of the MWD is most easily performed with the dog in sternal or prone position (but can be performed in lateral), head and neck extended, and tongue pulled forward. Capnometer reading >10 mmHg also verifies correct placement.
- If necessary assisted ventilation via an Ambu-bag can be performed at a rate of 8-10 breaths per minute.
Figure 1. Measure how far to advance the endotracheal tube
Hold the tracheal tube to the side of the dog and measure from the front of the canine incisors to the thoracic inlet or point of the shoulder.
Mark the tube with tape.
Figure 1. Measure how far to advance the endotracheal tube
Figure 2. Position MWD for intubation
Figure 2. Position MWD for intubation
Figure 3. Place tip of laryngoscope blade on back of tongue
DO NOT TOUCH THE EPIGLOTTIS (triangular tissue guarding the opening of the trachea)
Figure 3. Place tip of laryngoscope blade on back of tongue
Figure 4. Push downward with the laryngoscope blade to move the epiglottis and visualize the trachea

Figure 4. Push downward with the laryngoscope blade to move the epiglottis and visualize the trachea
Figure 5. Using a slight side to side motion, guide the endotracheal tube over the epiglottis between the vocal cords
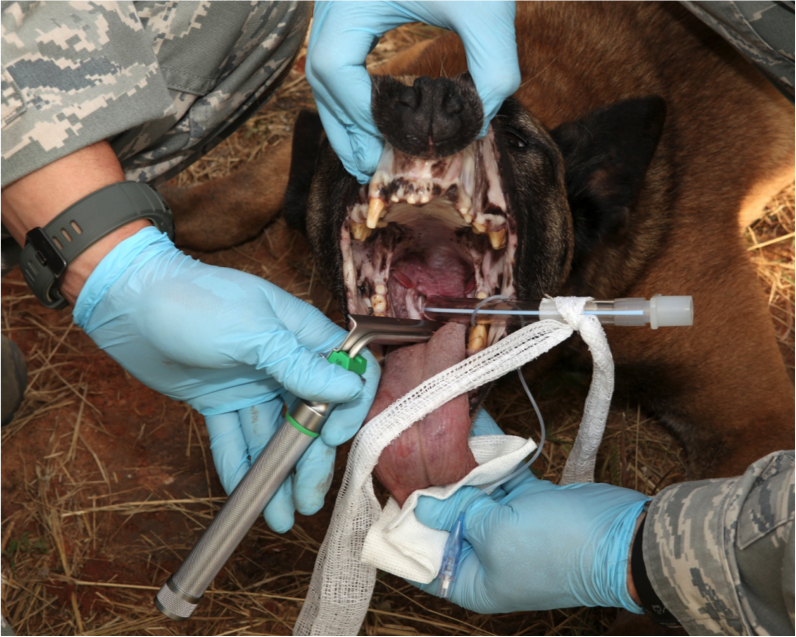
Figure 5. Using a slight side to side motion, guide the endotracheal tube over the epiglottis between the vocal cords
Figure 6. Advance and secure endotracheal tube
Advance the endotracheal tube into the trachea until your marked spot is even with the canine teeth.
Secure tube by placing attached roll gauze behind canine teeth and tying the loose ends in a bow around the upper or lower jaw.
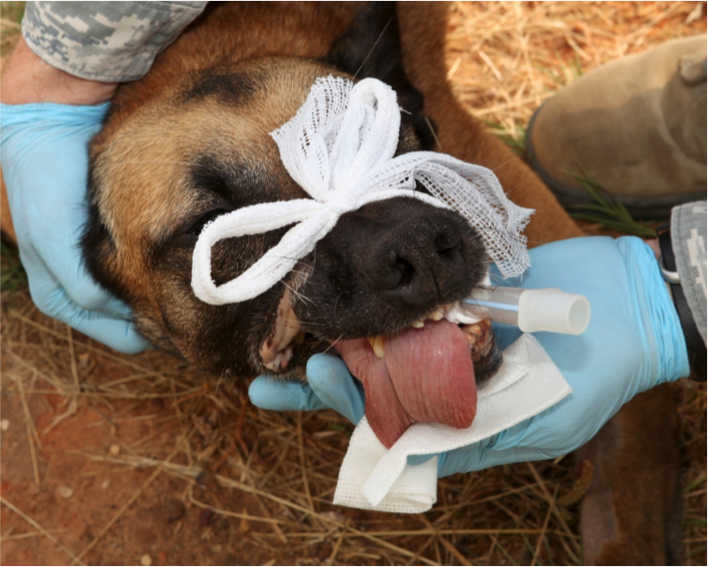
Figure 6. Advance and secure endotracheal tube
Figure 7. Check for proper placement.
One tube= In the trachea
Two tubes= In the esophagus
Figure 7. Check for proper placement
Figure 8. Inflate the cuff with a syringe until back pressure is noted
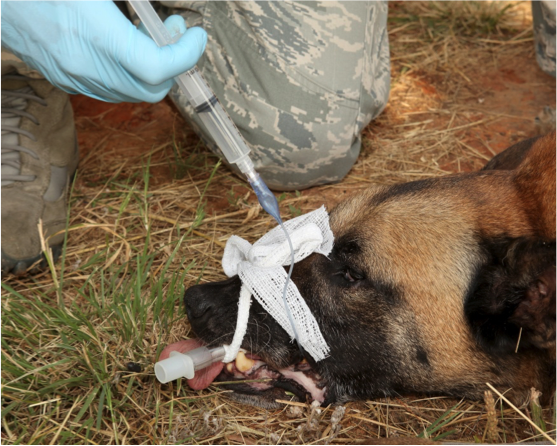
Figure 8. Inflate the cuff with a syringe until back pressure is noted
Surgical Airway
- Surgical airways are not warranted in an unconscious or anesthetized MWD that has no direct upper airway trauma unless the performance of basic airway positioning maneuvers is unsuccessful in opening the airway and / or the provider is unable to successfully perform ETI.
- Surgical Cricothyrotomy (CTT)
- Use techniques recommended for humans.
- Bougie-aided open surgical, flanged and cuffed airway cannula, 6 – 9 mm internal diameter, 5 – 8 cm intratracheal length.
- Standard open surgical, flanged and cuffed airway cannula, 6 – 9 mm internal diameter, 5 – 8 cm intratracheal length.
- Surgical Tube Tracheostomy (TT)
- Use the largest internal diameter tube that fits into MWD trachea; aim for a TT that is at least 70% of the estimated internal tracheal lumen diameter.
- Select a TT length of 5- 8 cm or one that does not extend beyond the thoracic inlet/point of shoulder.
- Blind Insertion Airway Device / Nasopharyngeal airways / Extraglottic Airway Devices have not been evaluated in canines and should not be utilized in MWDs.
Figure 9. Position MWD on its back
Extend the neck and place something under it to force it upwards, making it easier to visualize the trachea.
Figure 9. Position MWD
Figure 10. Make a full thickness skin incision along the center of the neck 2-3 finger widths below the larynx (voice box)using a scalpel blade.
If obstruction is in the trachea you must use a lower spot; otherwise use landmarks given.
Do NOT make a transverse skin incision (perpendicular to the long axis of the trachea), as this increases the risk of injury to adjacent vessels and nerves.
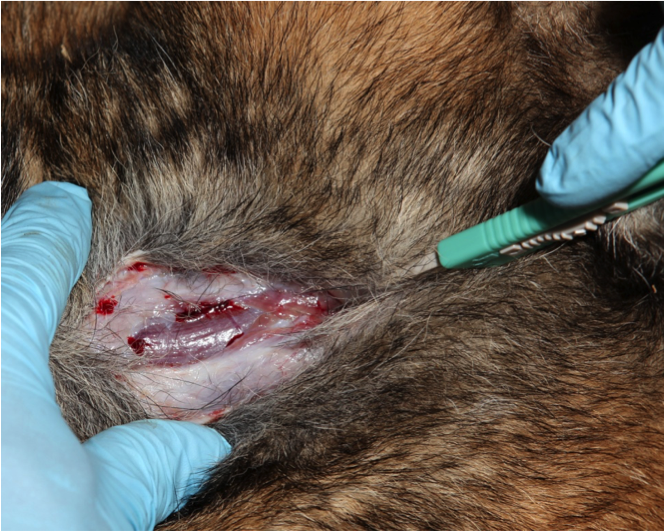
Figure 10. Make a full thickness skin incision
Figure 11. Use a scalpel to carefully separate the muscles the run parallel to the incision.
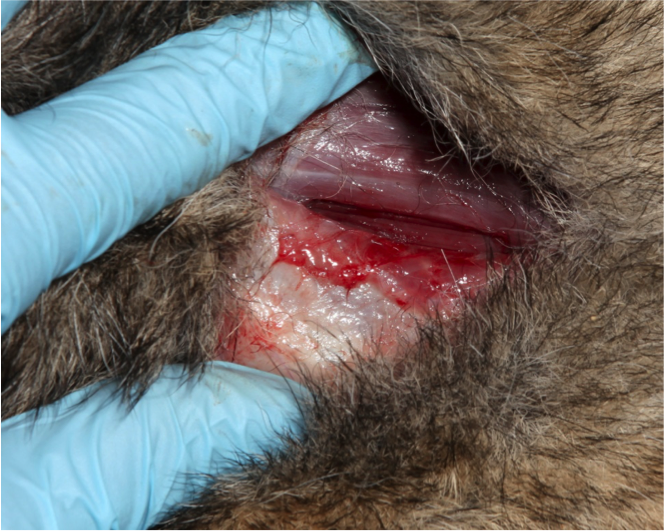
Figure 11. Use a scalpel to carefully separate the muscles the run parallel to the incision.
Figure 12. Hold the muscles apart to visualize the trachea
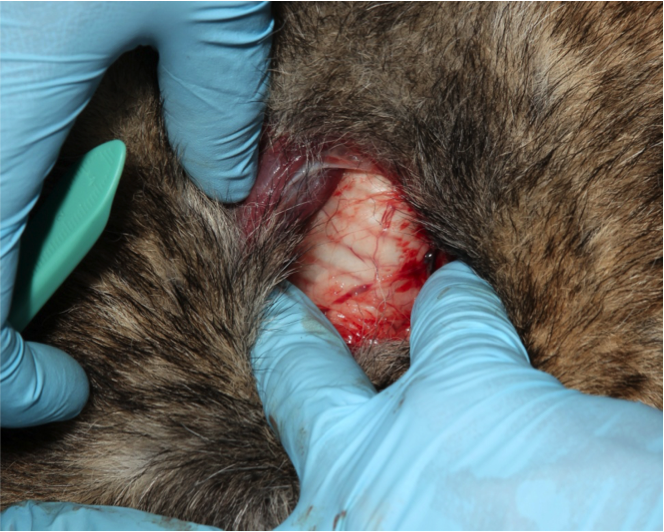
Figure 12. Hold the muscles apart to visualize the trachea
Figure 13. Make an incision in the trachea.
Stabilize the trachea with non-dominant hand
Make an incision between two rings of the trachea (between the 3rd and 4th or 4th and 5th tracheal cartilages). Do NOT extend the incision more than one-half (50%) of the diameter of the trachea. Do NOT incise at the cricothyroid ligament, as is done in people.
Remove blood or mucus, if present.
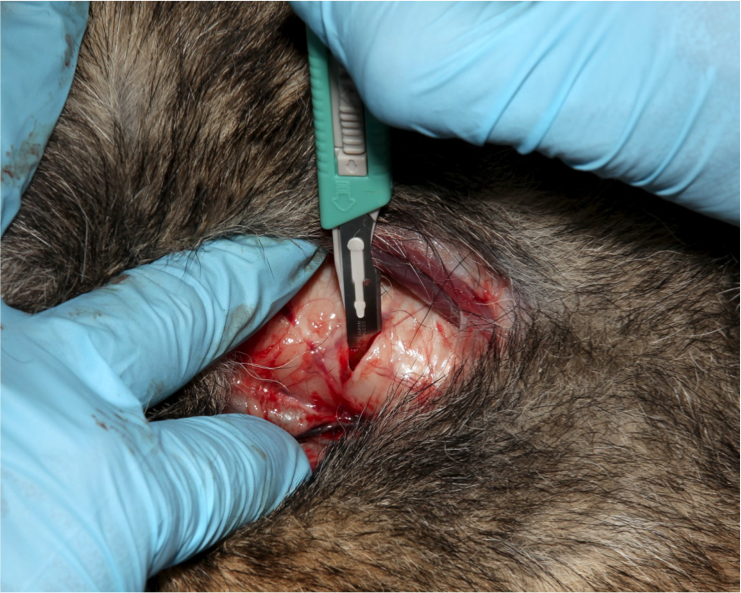
Figure 13. Make an incision in the trachea
Figure 14. Insert the tracheal retractor into the trachea
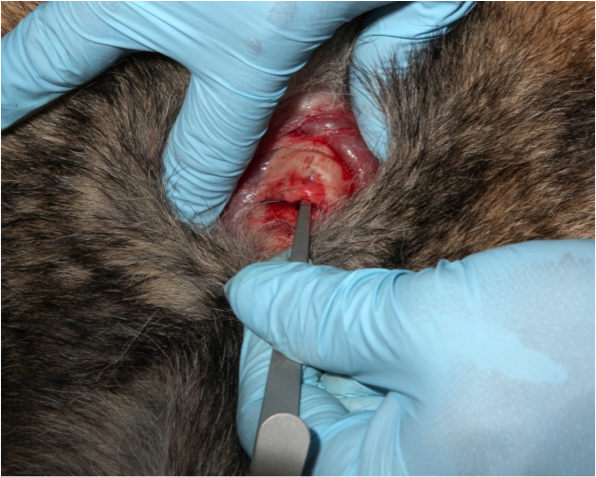
Figure 14. Insert the tracheal retractor into the trachea
Figure 15. Hook a lower tracheal ring and lift up so you can visualize the tracheal opening
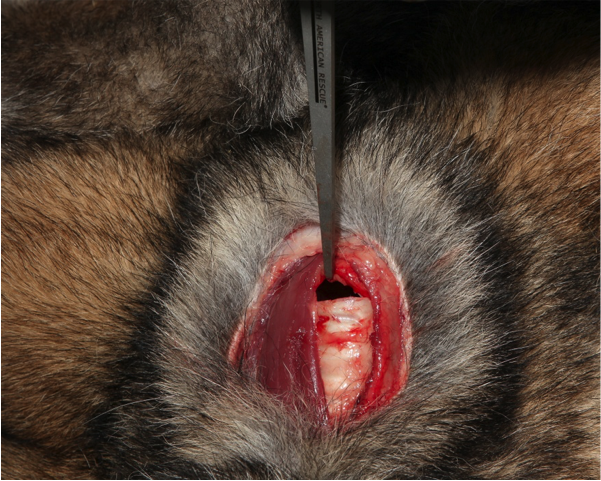
Figure 15. Hook a lower tracheal ring and lift up so you can visualize the tracheal opening
Figure 16. Insert tracheostomy tube (ideal) or endotracheal tube through the incision and direct the distal opening down the trachea.
Use the largest tube that will fit in the trachea; (7-11mm internal diameter tubes are typical).
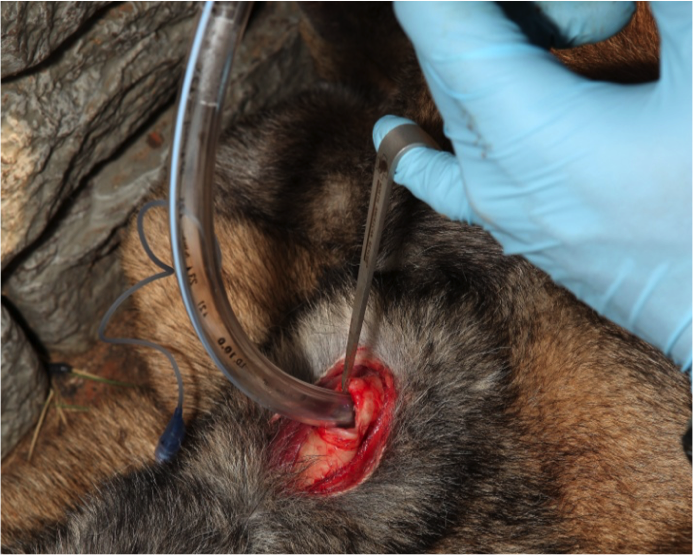
Figure 16. Insert tracheostomy tube (ideal) or endotracheal tube through the incision and direct the distal opening down the trachea.
Figure 17. Immediately provide supplemental oxygen
Breathe in the tube or use a hand-operated resuscitator

Figure 17. Immediately provide supplemental oxygen
Figure 18. Secure the tracheal tube
Secure the tracheal tube by attaching gauze bandage to the tube and tying it around the dog’s neck in a bow knot. Inflate the cuff until you get back pressure.
If using a tracheostomy tube, secure the tracheostomy tube to the patient using umbilical tape, roll gauze, or similar material tied to the wings of the tube and passed around the neck and tied with a quick release knot. Insert the inner cannula (if provided) in the tracheostomy tube (if used) and inflate the cuff of the tracheostomy tube.

Figure 18. Secure the tracheal tube
Notes:
- Cervical Spinal stabilization is not necessary for MWDs suffering only penetrating trauma.
- Monitor hemoglobin saturation (SpO2) and capnography when available, to help assess airway patency.
- Normal SpO2 values in MWDs are similar to those in people (> 94% on room / atmospheric air). Pulse Oximetry probe placement for MWDs in order of preference: tongue, non-pigmented area of lip, ear pinna, prepuce (male) or vulva (female); Recent data demonstrated the use of a human-designed neonatal pulse oximetry adhesive sensor attached to the base of a canine’s tail, may provide an alternative site for accurate and feasible pulse oximetry measurement in canines NOTE: Accurate pulse oximetry measurement is often only achievable in an unconscious or adequately sedated/anesthetized MWD.
- Capnography for MWDs is the same as for humans. An ETCO2 monitor can be attached to an intubated MWD. ETCO2 levels should be the same as for humans (35-45 mmHg).
- Always remember that the MWD’s airway status may change over time and requires frequent reassessment.
- Similar to a human casualty that can speak clearly without any respiratory distress, consider a MWD that is barking, growling, or whining without any clinical signs of respiratory distress has a patent airway.
- Consider monitoring the MWDs rectal temperature. Canines rely on panting to dissipate body heat, therefore, any upper airway obstruction increases their risk for a potential a heat-related illness.
- Due to anatomical / conformational differences, the tongue is not a major source of upper airway obstructions in canines as it is in human casualties.
- In MWDs experiencing respiratory fatigue from prolonged or strenuous increased work of breathing, even mild sedation may increase the risk of imminent respiratory failure/arrest; therefore, have resources prepared to perform rapid ETI or CTT/TT before administering any sedative or analgesia.
5. Respiration/ Breathing
Open and/or Sucking Chest Wounds
- All open and/or sucking wounds should be treated by immediately applying gloved hand over the wound/defect, followed by placement of a vented or non-vented occlusive seal to cover the defect.
- If hair clippers are not available, consider placing petroleum impregnated gauze on the underside of the chest seal to facilitate forming an occlusive seal between the skin and the chest seal.
- Secure in-place on all four-sides with adhesive tape or with a snug, not overly tight, circumferential chest wrap.
- Monitor /assess the MWD for development of tension pneumothorax and treat as necessary (see section below).
Figure 19. Apply occlusive seal to wound
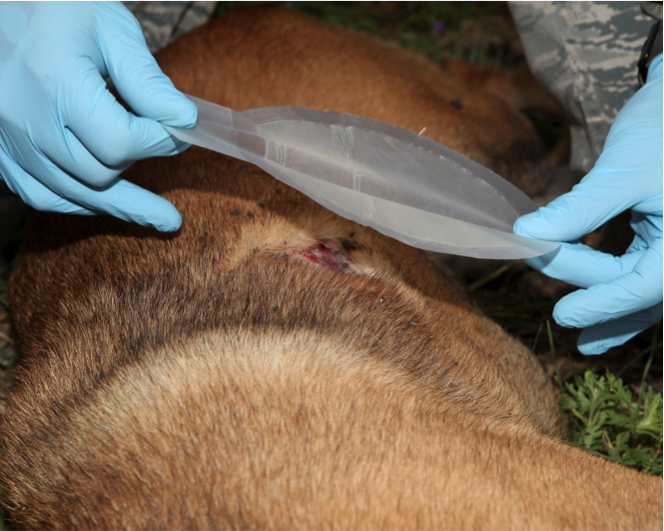
Figure 19. Apply occlusive seal to wound
Figure 20. Seal the occlusive dressing by applying pressure
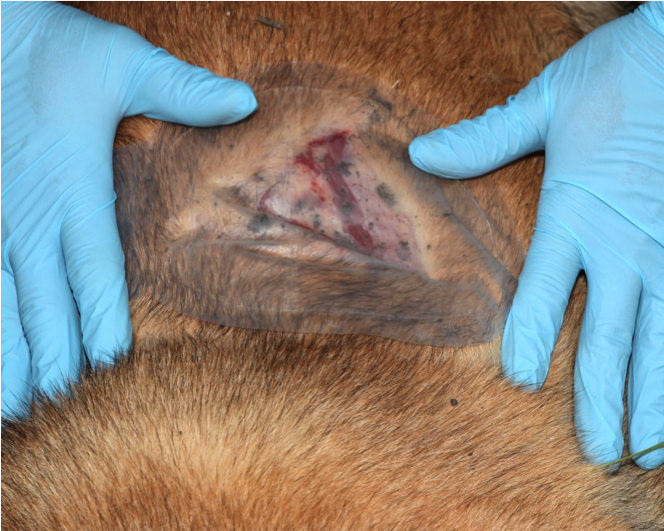
Figure 20. Seal the occlusive dressing by applying pressure
Figure 21. Dress the wound
Maintain pressure on occlusive seal.
With free hand, place dressing over occlusive seal.
Use free ends of dressing to bandage around chest.
If the air tight seal is lost at any time during this process, start over.
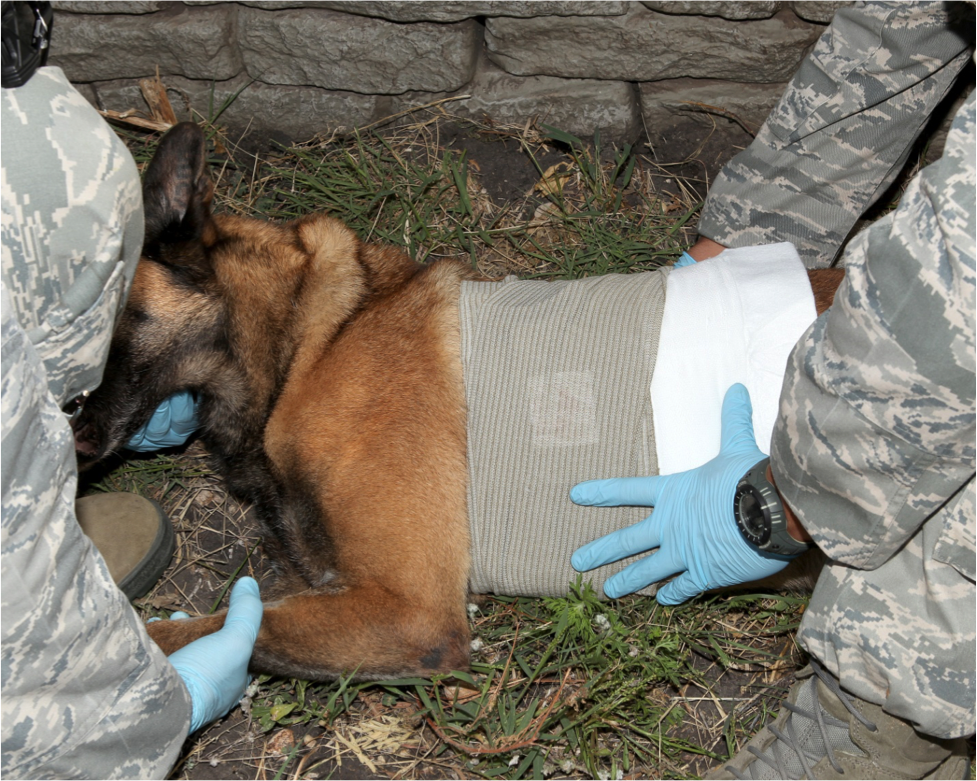
Figure 21. Dress the wound
Figure 22. Apply bandage of non-adherent conforming material over the field dressing to add security
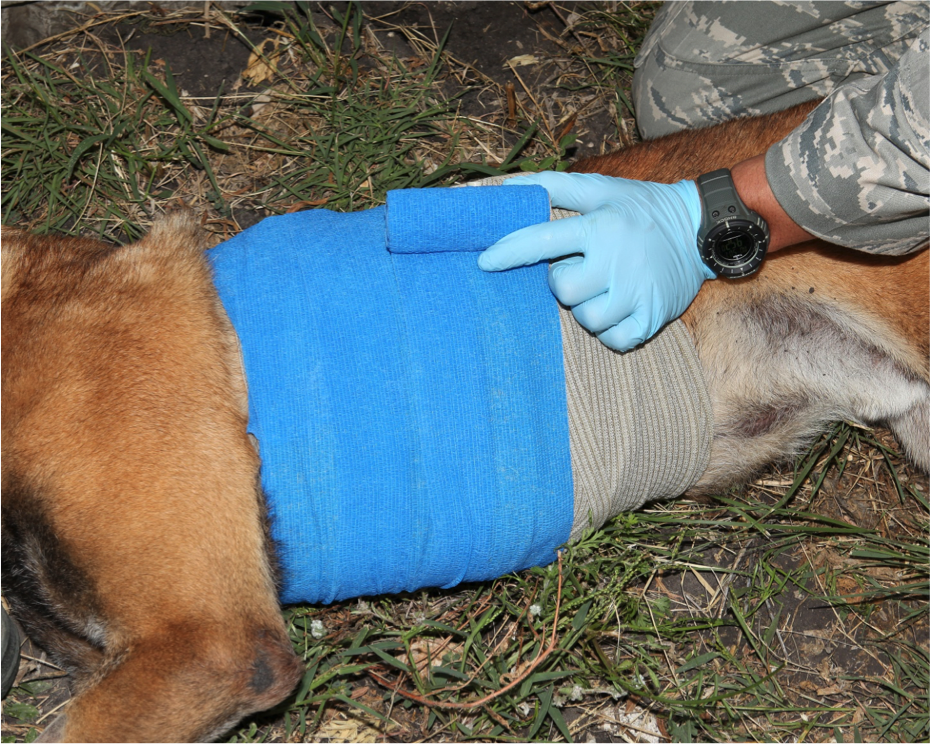
Figure 22. Apply bandage of non-adherent conforming material over the field dressing to add security
Tension Pneumothorax
- Suspect a tension pneumothorax in the setting of known or suspected torso trauma or primary blast injury and one or more of the following:
- Severe or progressive respiratory distress
- Severe or progressive tachypnea
- Rapid, shallow, restrictive and open-mouth breathing
- Absent or markedly decreased sounds on one or both sides of chest
- Circulatory shock [weak to absent femoral pulses, pale mucous membranes, prolonged capillary refill time (> 3 – 4 seconds), decreased mental status, cold extremities, tachycardia to bradycardia).
- Traumatic cardiac arrest without obviously fatal wounds.
- Hemoglobin oxygen saturation < 90% on pulse oximetry.
- Signs of respiratory distress in MWDs may include:
- Acting agitated, unable to get comfortable, or reluctance to lie down,
- Head and neck extended with elbows held out away from body (e.g. tripod position),
- Dyssynchronous breathing pattern (g. abdomen and chest move in opposite directions during inspiration),
- Minimal chest excursion with increased abdominal breathing,
- Lack of drive and response to even basic commands, unwillingness to move,
- Cyanotic (blue) gums (late finding).
- If not treated promptly, tension pneumothorax may progress from respiratory distress to circulatory shock and traumatic cardiac arrest.
- Initial treatment of suspected tension pneumothorax consider:
- “Burping” or removing the occlusive chest seal (if present); if this doesn’t relieve the MWDs clinical signs, prepare to perform a chest needle decompression.
- Due to the extensible nature of the canine’s skin and their vast subcutaneous space (SC), placing a chest seal that occludes only the external skin wound, and not the defect in the chest wall, may allow air from chest cavity to leak and become trapped into the SC space, resulting in significant amount of subcutaneous emphysema. With that in mind, if a tension pneumothorax develops after placement of an occlusive chest seal, burping or removing the chest seal may not completely resolve a tension pneumothorax in canines, particularly, if the occlusion is occurring at the level of the defect in the chest wall (due pieces of tissue, bone, etc.).
- Perform a chest needle decompression (NDC)
- Allow a conscious MWD to assume the ‘position of comfort’ (often the canine will elect to sit or stand). If unconscious, place in the recovery (sternal) position or lateral recumbency, placing the injured/affected side facing up.
- Use a 10 to 14-gauge, 2 to 3.25 inch (5 – 8 cm) over-the- needle/catheter unit.
- Insert in the 7th to 9th intercostal space midway up the lateral thoracic wall or at the junctions of the upper 1/3rd and lower 2/3rd of the thoracic wall.
- Drawing a line from the point of the shoulder (greater tubercle of the proximal humerus) to the distal tip of the last rib, defines the appropriate landmark for a chest- NDC in a MWD.
- NOTE: Canines have 13 ribs, the first 12 ribs are attached to the sternum via cartilaginous extensions and the 13th rib “floats” free of sternal attachment; in comparison, humans have 12 ribs.
- Ensure that the needle enters cranial (towards the head) of the rib.
- The intercostal artery, vein, and nerve run on the caudal aspect (behind or towards the tail) of each rib; therefore, similar to the technique in human casualties, the best approach for inserting chest-NDC device is in the center of the intercostal space or at the cranial aspect (towards the head) of the rib to avoid damaging the nerve and vascular structures.
- Insert the needle/catheter unit perpendicular to the chest wall.
- Insert the needle/catheter unit together until the needle can be felt entering the pleural space. Two distinct “pops” will be felt through the needle – the first will be felt as the needle/catheter unit passes through the skin and the second will be felt when the needle penetrates the pleural cavity (this occurs when the catheter is inserted to ½-¾ of its length). As the needle enters the pleural space, direct the needle/catheter unit ventral (towards the sternum) to allow the needle/catheter unit to lie parallel along the long axis of the internal thoracic wall as it is inserted to the hub; this mitigates any risk of inducing lung or cardiovascular trauma when inserting the needle/catheter unit to the hub.
- Note: Because of conformational differences, MWDs will have a shorter distance between their skin and the lateral thoracic wall (similar to the anterior axillary chest NDC site in humans); therefore, “hubbing” a 3.25 inch or longer catheter is typically not necessary in an MWD and may cause damage to intrathoracic structures if performed incorrectly.
- Ensure the bevel of the needle faces away from the inner thoracic wall and towards to the lungs.
- Hold the needle/catheter unit in placed for at least 5 – 10 seconds to allow full decompression to occur.
- Once air is evacuated, remove the needle stylet. Consider leaving the catheter in place to alert subsequent care providers that the MWD has received treatment for a suspected tension pneumothorax.
- DO NOT assume that the catheter will reliably continue to decompress the pleural space; it may become occluded with clotted blood, or quickly kink or migrate out of the pleural space due to the highly extensible nature of the canine skin.
- Always consider decompressing BOTH SIDES (LEFT & RIGHT) of the chest, particularly, if decompression of the initial side fails to fully relieve signs consistent with a tension pneumothorax or in the presence of a traumatic cardiac arrest an concurrent torso trauma or primary blast injury;
- Canines often have a fenestrated /communicating mediastinum (like a cheesecloth) that allows air to migrate to both sides of the thoracic cavity.
- Consider the NDC successful if a combination of any of the following is identified:
- Respiratory distress improves, or
- An obvious hissing sound is heard as air escapes from the chest (most likely difficult to hear in high-noise environments), or
- Hemoglobin oxygen saturation increases to 90% or greater (may take several minutes to reflect change and may not happen at altitude), or
- A MWD with no vital signs has return of consciousness and/or femoral pulse.
- If initial NDC fails to improve MWDs clinical signs from the suspected tension pneumothorax:
- Reposition MWD, if needed, and perform a second NDC on the opposite chest wall using a new needle/catheter unit.
- If the MWD was initially in sternal recumbency, you may consider re-attempting the NDC on the same side by repositioning the MWD into lateral recumbency with the desired side to decompress (injured side) facing up. Perform a second NDC on the same side using a new needle/catheter unit. Note: Re-positioning the canine into lateral may allow air to redistribute, rise and accumulate to the highest point on the affected side.
- If initial NDC is successful, but clinical signs re-develop:
- Perform another NDC on the same side; use a new needle/catheter unit:
- Continually reassess – reassess!
- If the second needle decompression is also unsuccessful:
- Continue on to the Circulation section of the Canine- TCCC guidelines.
Notes
- When available, initiate pulse oximetry and monitor pulse oximetry in all MWDs suffering moderate to severe TBI. The presence of circulatory shock or marked hypothermia (< 95°F / 35°C) may adversely influence readings.
- Pulse oximetry probes used for people (typically finger probes) are best placed on the tongue for optimal reliability in unconscious, sedated or anesthetized dogs. In conscious dogs, use the ear pinna, lip fold, or inguinal skin fold; while not optimal for oximetry, these alternate sites generally yield reliable results in most instances. Alternatively a neonatal pulse oximetry adhesive sensor attached to the base of a canine’s tail may be used as alternative site in MWDs.
- Consider administering oxygen supplementation when SpO2 < 94% on room/atmospheric and when available.
6. Circulation
Bleeding
- Reassess sites of major hemorrhage and associated hemostatic interventions. Ensure that bleeding is stopped. If bleeding persists, consider changing or adding additional hemostatic adjuncts (eg. Combat gauze, chitosan based dressings, or X-Stat) and/or re-applying circumferential pressure bandages and wound packing, where applicable.
- iTClamp should be considered to close bleeding open wounds or can be used concurrently with hemostatic agents.
- If major bleeding cannot be stopped with dressings, consider application of a tourniquet if:
- Extremity hemorrhage appears life threatening (e.g. MWD has suffered a complete traumatic limb or tail amputation), AND
- Bleeding remains refractory to other methods of hemostasis (e.g. direct pressure, pressure dressing, etc.), AND
- The anatomical site is amenable to tourniquet application (e.g. limbs and tail wounds)
- When a tourniquet is warranted (as per above), consider applying a wide, elastic, non-windlass, moldable tourniquet (e.g. SWAT-T®), if available.
- Immobilize and ELEVATE the area when practical and feasible. Keep the MWD as calm as possible to avoid inadvertent elevations in arterial blood pressure.
- Expose and clearly mark all tourniquets with the time of tourniquet application. Note tourniquets applied and time of application; time of re-application; time of conversion; and time of removal on the canine TCCC Casualty Card. Use a permanent marker to mark on the tourniquet and the casualty.
- Note: Pelvic binders have not been evaluated in dogs. However because pelvic fractures in dogs are very unlikely to result in life threatening hemorrhage, pelvic binders are not recommended in MWDs at this time.
IV/IO Access
- Intravenous (IV) or intraosseous (IO) access is indicated if the MWD is in hemorrhagic shock or at significant risk of shock (and may therefore need fluid resuscitation), or if the MWD needs medications, but cannot take them by mouth.
- An 18-gauge IV or saline lock is preferred. Place in the cephalic (dorsal/anterior aspect over the radius) or lateral saphenous (hind limb over the lateral distal tibia) vein. The external jugular vein can be considered as an alternative option. For external jugular vein access, due to the increased length and flexibility of the MWD’s neck as compared to a person, a longer catheter (eg.14 or 16 gauge x 3.25 inch) is preferred over an 18 gauge x 1.25 to 1.5 inch catheter commonly used for peripheral vein access.
Figure 23. Position the dog
Muzzle the dog. Handler restrains the dog in a sitting position or lying on its chest. If dog is conscious, handler restrains the dog’s head by wrapping the arm around the dog’s neck and cradling the dog’s head and neck in the elbow.
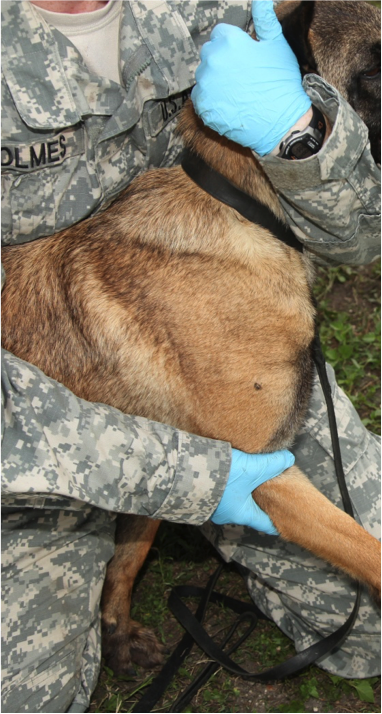
Figure 23. Position the dog
Figure 24. Occlude the cephalic vein
If dog is conscious, handler places thumb over the cephalic vein and heel of the hand under the dog’s elbow. If dog is unconscious, can use a tourniquet. Extend the arm at the elbow.
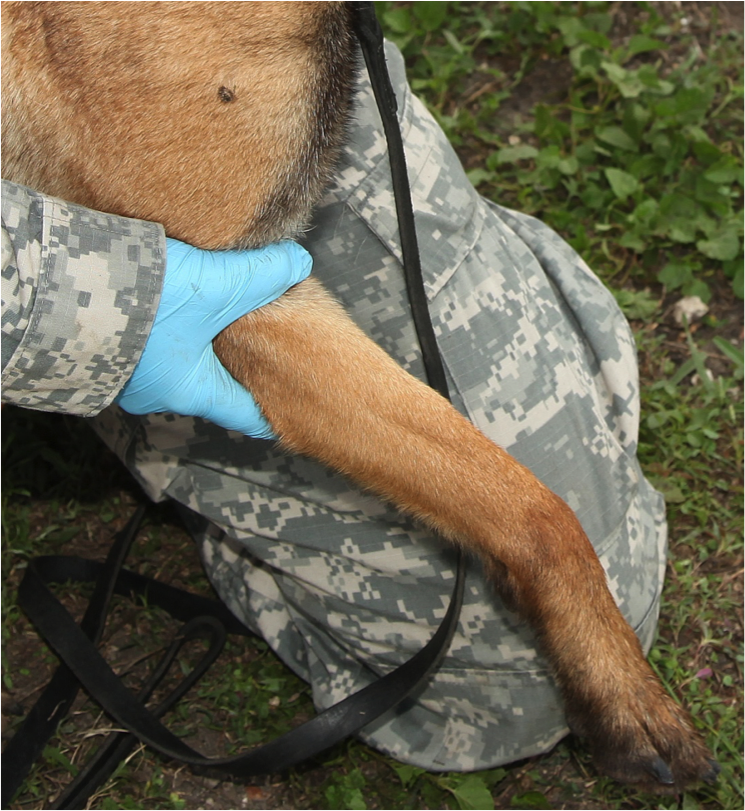
Figure 24. Occlude the cephalic vein
Figure 25. Placing your thumb directly besides the vein and wrapping your remaining fingers underneath the leg, pierce the skin with the catheter needle
Bevel facing up at a 10 to 30 degree angle to the skin
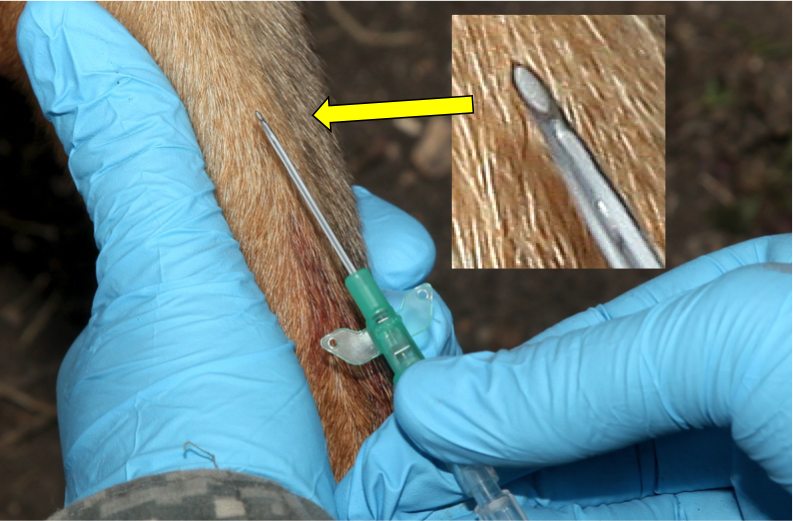
Figure 25. Pierce the skin with the catheter
Figure 26. Pierce the vein by advancing the catheter and then decrease the angle of the catheter until almost parrallel to the skin surface.
The flash of blood confirms correct placement.
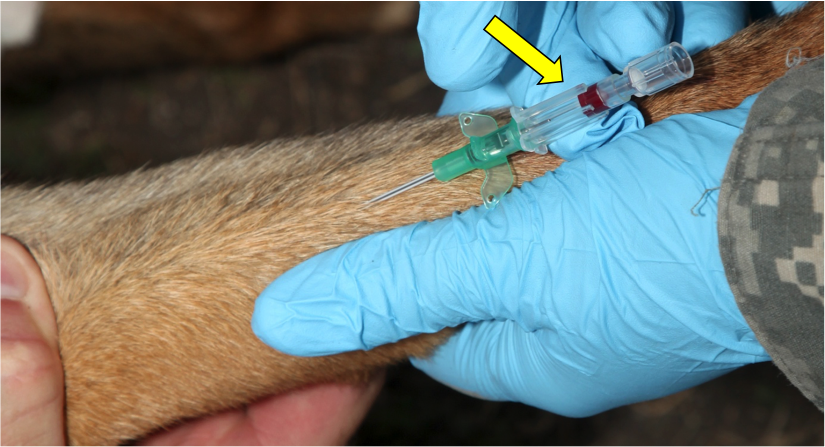
Figure 26. Pierce the vein with the catheter
Figure 27. Advance the catheter needle approximately 1/4 inch into the vein using a gentle forward motion
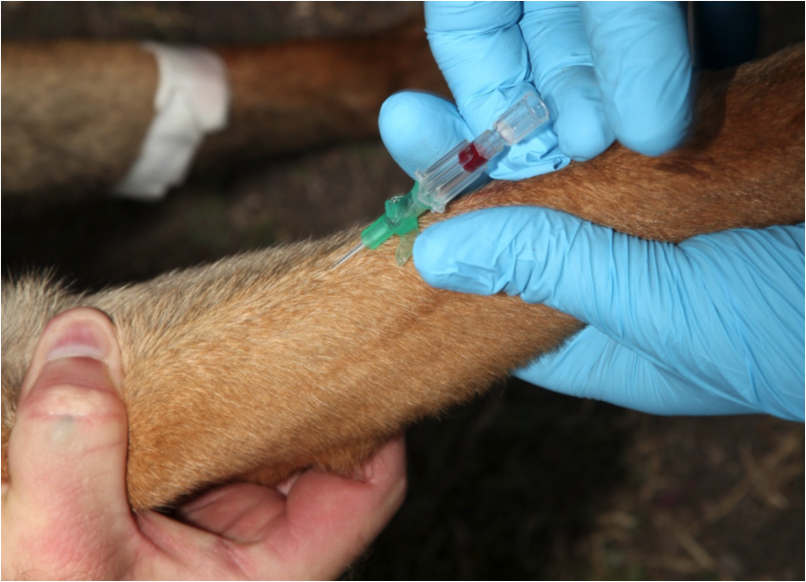
Figure 27. Advance the catheter needle
Figure 28. Advance the catheter into the vein as far as possible while holding the catheter needle hub with one hand
Then have the handler release pressure on the vein but continue to hold elbow in place; or release tourniquet.
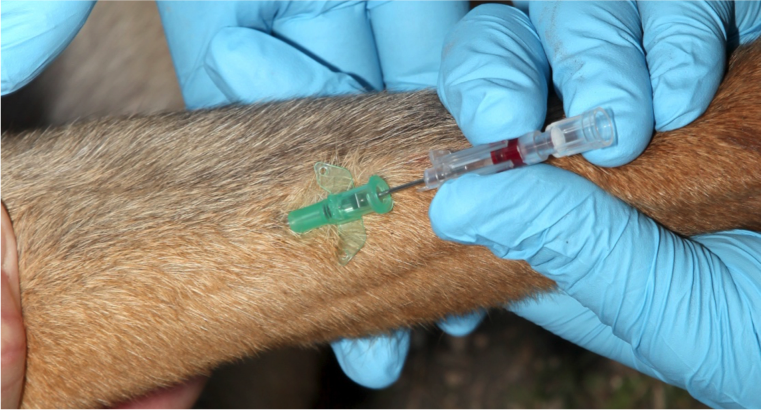
Figure 28. Advance the catheter into the vein
Figure 29. Remove the needle from the catheter by pulling it out while stabilizing the catheter
Then quickly attach catheter injection port onto the hub of the catheter.

Figure 29. Remove the needle
Figure 30. Secure the catheter to the limb with tape
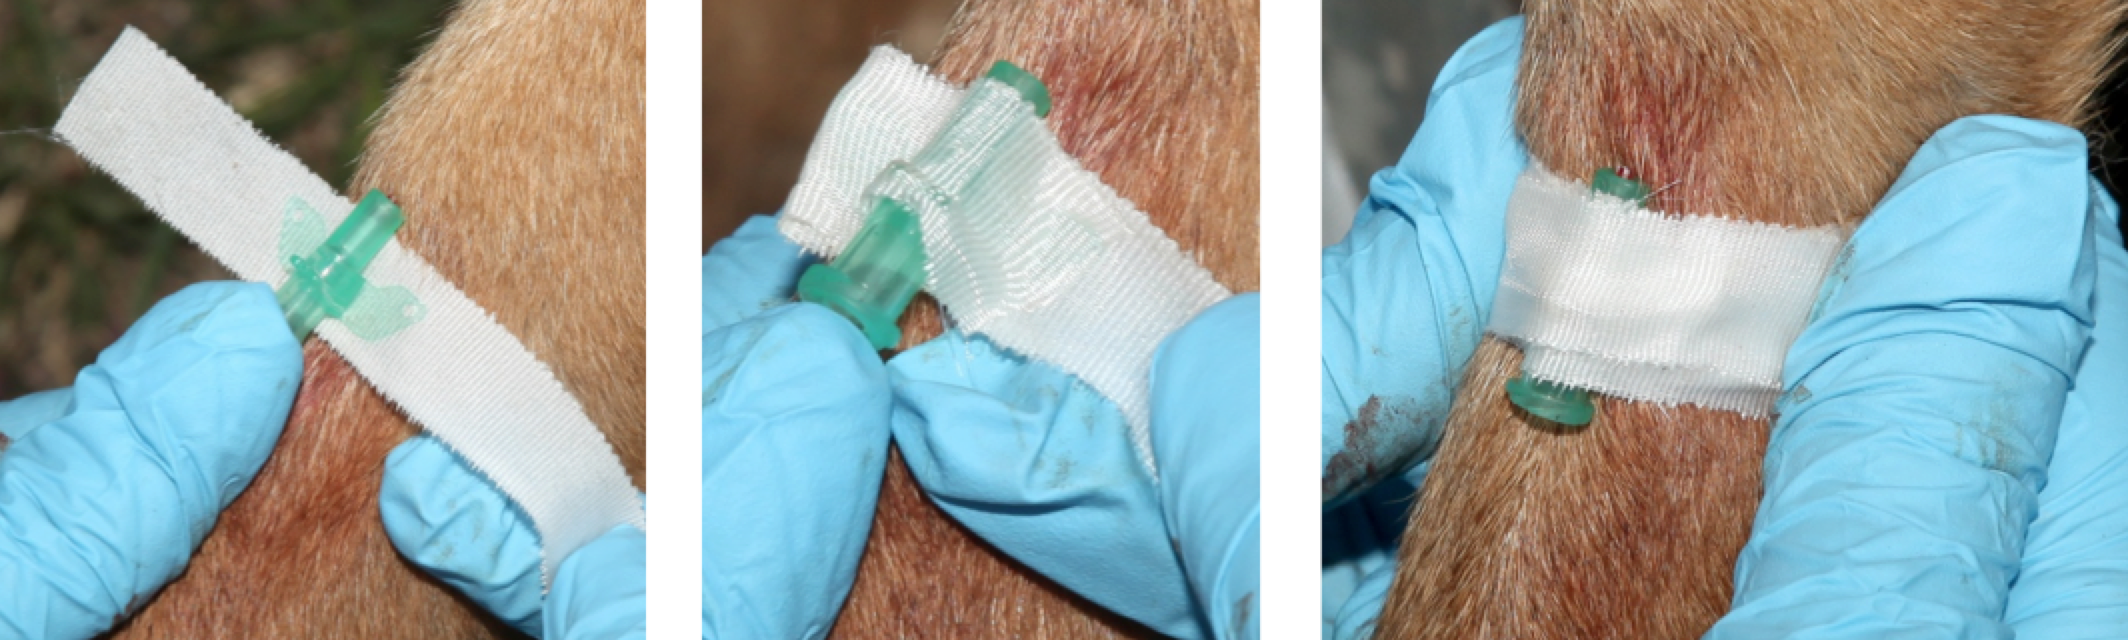
Figure 30. Secure the catheter to the limb with tape
- If vascular access is needed but not quickly obtainable via the IV route, use the IO route.
- Recommended sites for IO placement in a canine include the:
- Proximal, lateral humerus at the caudal aspect of the greater tubercle, or
- Proximal, medial tibia caudal to the distal aspect of the tibial tuberosity
- Recommended IO catheter size is 25mm x 15 gauge (BLUE) for MWDs over 40#
Figure 31. Location for IO catheter placement on proximal medial tibia
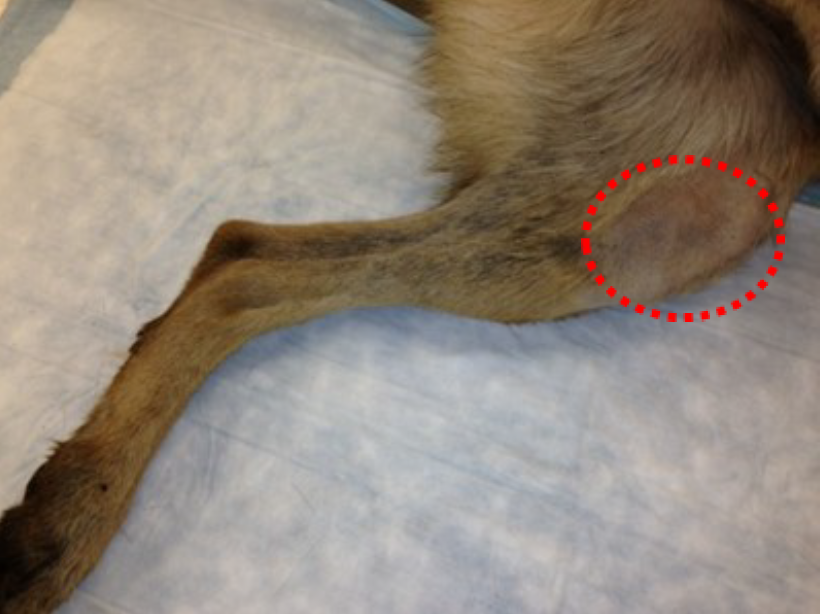
Figure 31. Location for IO catheter placement on proximal medial tibia
Figure 32. Intended insertion site (red oval) on proximal medial tibial crest, just distal to the knee joint
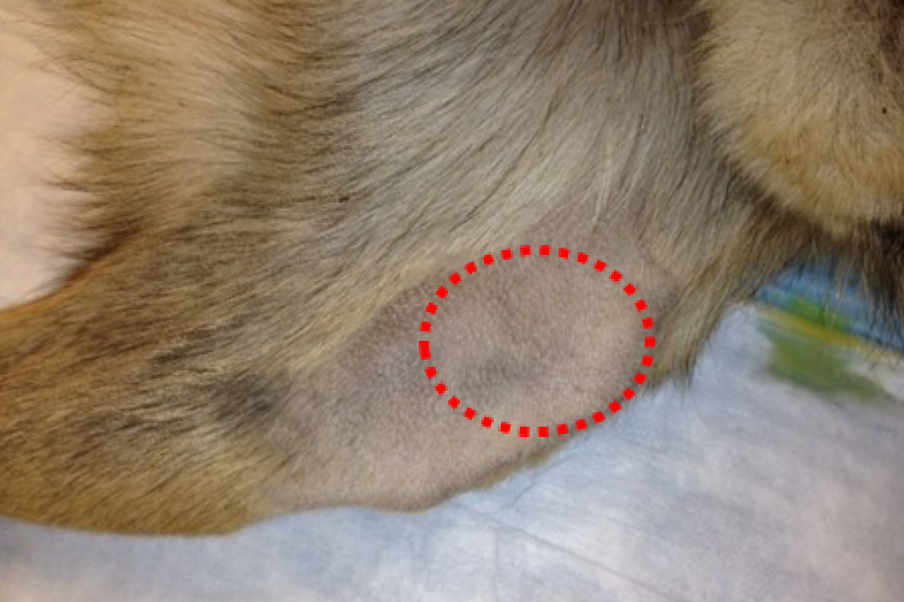
Figure 32. Intended insertion site (red oval) on proximal medial tibial crest
Figure 33. Insertion of pediatric IO catheter in proximomedial tibia using EZ-IO device
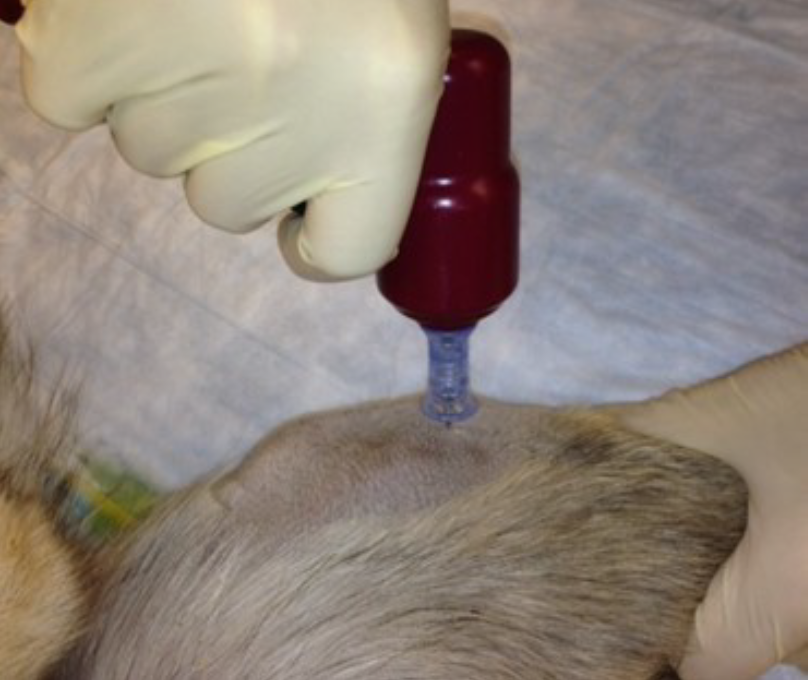
Figure 33. Insertion of pediatric IO catheter in proximomedial tibia
Figure 34. Full insertion of IO catheter after removal of stylet
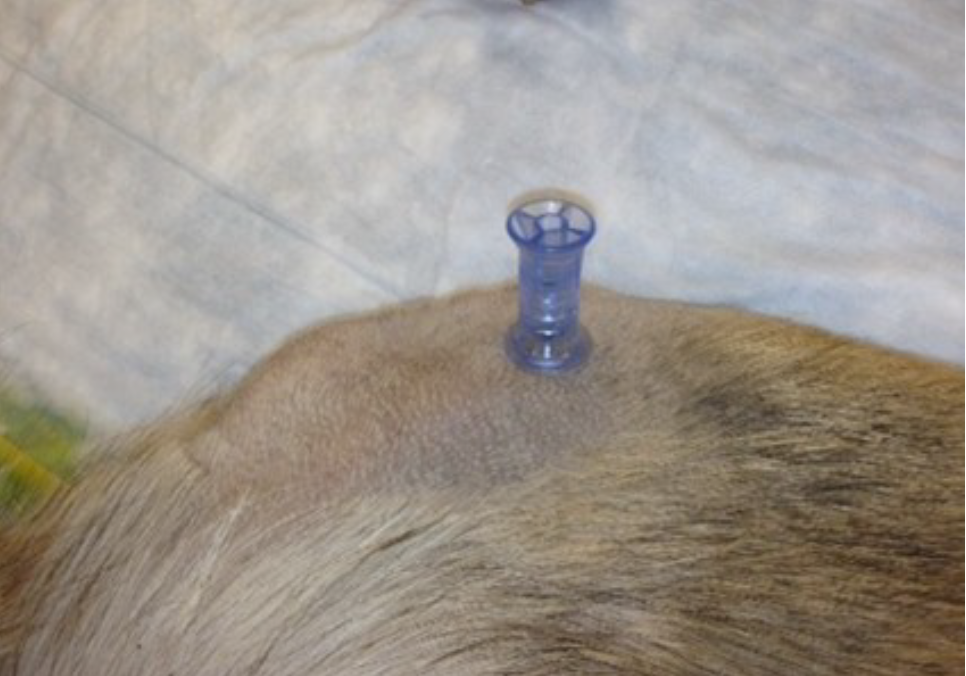
Figure 34. Full insertion of IO catheter after removal of stylet
Tranexamic Acid (TXA)
- If a MWD is anticipated to need significant blood transfusion (for example: presents with hemorrhagic shock, one or more major amputations, penetrating torso or abdominal trauma, or evidence of severe bleeding):
- Administer 10 mg/kg of tranexamic acid as a slow IV push or in 100 ml Normal Saline or Lactated Ringers as soon as possible but NOT later than 3 hours after injury. When given, TXA should be administered over 10 minutes by IV/IO infusion.
- Begin a second infusion of 10 mg/kg of TXA as a continuous infusion over 8 hours after initial fluid resuscitation has been completed.
Fluid resuscitation
- Assess for hemorrhagic shock (pale mucus membranes, inappropriate mentation in the absence of head trauma, weak or absent femoral pulse).
- The resuscitation fluids of choice for MWDs in hemorrhagic shock, listed from most to least preferred, are: canine chilled or fresh whole blood; canine plasma and RBCs in a 1:1 ratio; canine plasma or RBCs alone; crystalloid (Lactated Ringer’s, Normosol R or Plasma-Lyte A) Hextend/Hespan. (NOTE: Hypothermia prevention measures [Section 7] should be initiated while fluid resuscitation is being accomplished.)
- If not in shock:
- No IV fluids are immediately necessary.
- Fluids by mouth are permissible if the MWD is conscious and can swallow.
- If in shock and canine blood products are available:
- Resuscitate with canine whole blood [initial dose is one 500 mL unit as a bolus or titrated depending on situation], or, if not available.
- Canine plasma and canine RBCs in a 1:1 ratio [initial dose is one 250 mL unit of plasma plus one 250 mL unit of pRBC bolused or titrated depending on situation], or, if not available.
- Reconstituted dried canine plasma, canine liquid plasma or thawed canine fresh frozen plasma [initial dose is one 250 mL unit of any of the above mentioned plasma products bolused or titrated depending on situation] alone or canine pRBCs alone [initial dose is one 250 mL unit of pRBC bolused or titrated depending on situation]
- Note: DO NOT administer human blood products to a canine. Human blood products have a high probability of causing a hemolytic reaction when transfused into a canine.
- Reassess the MWD after each unit. Continue resuscitation until a palpable femoral pulse, improved mental status or systolic BP of 80-90 is
- If in shock and blood products are not available due to tactical or logistical constraints:
- Lactated Ringers, Normosol R or Plasma-Lyte A
- Reassess the MWD after each 500 ml IV/IO bolus.
- Continue resuscitation until a palpable femoral pulse, improved mental status, or systolic BP of 80-90 mmHg is present.
- Discontinue fluid administration when one or more of the above end points has been achieved.
- If a MWD with an altered mental status due to suspected TBI has a weak or absent femoral pulse, resuscitate as necessary to restore and maintain a normal femoral pulse. If BP monitoring is available, maintain a target systolic BP of at least 90 mmHg.
- Reassess the MWD frequently to check for recurrence of shock. If shock recurs, re-check all external hemorrhage control measures to ensure that they are still effective and repeat the fluid resuscitation as outlined above.
Refractory Shock
- If a MWD in shock is refractory to fluid resuscitation and canine blood products are not available, consider:
- The use of synthetic colloids (Hextend® and/or Hespan®) – 150-200 mL bolus IV/IO. Can repeat if shock state is not resolved.
- Untreated tension pneumothorax as a possible cause of refractory shock. Thoracic trauma, persistent respiratory distress, absent breath sounds, and hemoglobin oxygen saturation < 90% support this diagnosis. Treat as indicated above with repeated NDC or finger thoracostomy/chest tube insertion.
7. Hypothermia Prevention
- Minimize MWD’s exposure to the elements.
- Remove any wet outer wear (e.g. vests, harnesses, booties, etc.). GENTLY pat dry any wet tissues or hair coat.
- Get the MWD onto an insulated surface as soon as possible.
- Apply the Ready-Heat Blanket from the Hypothermia Prevention and Management Kit (HPMK) to the MWD’s torso (not directly on the skin) and cover the MWD with the Heat- Reflective Shell (HRS).
- If an HRS is not available, the previously recommended combination of the Blizzard Survival Blanket and the Ready Heat blanket may also be used.
- If the items mentioned above are not available, use dry blankets, poncho liners, sleeping bags, or anything that will retain heat and keep the MWD dry.
- Warm fluids are preferred if IV fluids are required.
8. Penetrating Eye Trauma
- If a penetrating eye injury is noted or suspected:
- Place muzzle if practical before examining the eye
- Do NOT attempt to bandage or cover the eye. Make every effort to prevent MWD from scratching at the eye. Consider sedation as outlined in section 10.
- Ketamine can cause nystagmus and increased intraocular pressure in a MWD. Therefore consider alternative sedatives/analgesics in MWDs with penetrating eye traumas unless other alternatives do not exist or are ineffective.
- If possible, gently rinse the eye with clean water
- Ensure that oral or IV/IM antibiotics are given as outlined in section 11.
9. Monitoring
- Initiate advanced electronic monitoring if indicated and if monitoring equipment is available.
- Monitors of choice include pulse oximetry (placed on the lip, tongue or prepuce) and capnography if intubated
10. Analgesia
Analgesia on the battlefield should generally be achieved using one of three options:
Option 1 Mild to Moderate Pain
- Meloxicam - ½ of a 7.5 mg tablet (0.1 mg/kg) PO once a day
- **DO NOT give Tylenol or ibuprofen to an MWD
Option 2 Moderate to Severe Pain
- MWD IS NOT in shock or respiratory distress AND
- MWD IS NOT at significant risk of developing either condition
- Do not attempt to give Oral transmucosal fentanyl citrate (OTFC) to an MWD.
- Rather administer ONE of the below options:
- Morphine at 0.25-0.5 mg/kg IM (equivalent to one 10 mg morphine autoinjector) or
- Hydromorphone 0.1 mg/kg IV/IO/IM or
- Fentanyl (injectable) q 20 – 30 min at:
- 2 – 5 mcg/kg IV/IO
- 10 mcg/kg IM
- 4 mcg/kg IN (Intranasal)
- * Morphine and hydromorphone often causes vomiting in dogs so handlers and medics should be prepared to remove the muzzle after administration of an opioid. Hydromorphone causes excessive panting; use caution with head injuries and respiratory
Option 3 Moderate to Severe Pain
- MWD IS in hemorrhagic shock or respiratory distress OR
- MWD IS at significant risk of developing either condition
- Ketamine 2-5 mg/kg (60-90 mg) IV/IO/IM/IN
- If possible, strongly consider combination therapy whenever using ketamine in MWDs. Suggest a combination of 50 mg ketamine with either an opioid (5 mg of morphine OR 3 mg of hydromorphone OR 150 mcg fentanyl) OR a benzodiazepine (10 mg of midazolam or diazepam) to improve analgesia and sedation
- * End points: Control of pain and appropriate level of sedation. MWD should be generally recumbent but responsive and breathing comfortably
Notes
- For all casualties given opioids or ketamine – monitor airway, breathing, and circulation closely.
- Consider adjunct administration of antiemetics (Ondansetron 8-16 mg IV or 24 mg PO) prior to administering opioids.
- Naloxone should be available when using opioid analgesics.
- Recommended doses are: 2 mg IV/IO or 4mg IM/IN, Repeat as needed.
- Both ketamine and opioids have the potential to worsen severe TBI. The combat medic, corpsman, or PJ must consider this fact in his or her analgesic decision, but if the MWD is vocalizing and demonstrating painful behaviors, then the TBI is likely not severe enough to preclude the use of ketamine or opioids.
- Ketamine may be a useful adjunct to reduce the amount of opioids required to provide effective pain relief. It is safe to give ketamine to a MWD who has previously received morphine. IV Ketamine should be given over 1 minute.
- If respirations are noted to be reduced after using opioids or ketamine, provide ventilatory support with a bag-valve-mask or mouth-to-mask ventilations.
- REASSESS, REASSESS, REASSESS
11. Antibiotics
- Antibiotics are recommended for all open combat wounds.
- Recommended antibiotics in order of preference are:
- Ceftriaxone 25 mg/kg IV/IM q 12 hrs
- Cefotaxime 25 mg/kg IV/IM q 8 hrs
- Ertapenem, (15-30 mg/kg) IV/SC every 8 hours
- If able to take PO meds consider:
- Moxifloxacin (from the CWMP), 400 mg PO once a day
12. Inspect and Dress Known Wounds
13. Check for Additional Wounds
Check for additional wounds.
14. Burns
- Facial burns, especially those that occur in closed spaces, may be associated with inhalation injury. Aggressively monitor airway status and oxygen saturation in such patients and consider early intubation or surgical airway for respiratory distress or oxygen desaturation.
- Estimate total body surface area (TBSA) burned to the nearest 10% using the Rule of Nines.
- Cover the burn area with dry, sterile dressings. For extensive burns (>20%), consider placing the casualty in the Heat-Reflective Shell or Blizzard Survival Blanket from the Hypothermia Prevention Kit in order to both cover the burned areas and prevent hypothermia.
- Fluid resuscitation (extrapolated from the USAISR Rule of Ten)
- If burns are greater than 20% of TBSA, fluid resuscitation should be initiated as soon as IV/IO access is established. Initiate resuscitation with (order of preference) Lactated Ringer’s, Plasma-Lyte A/Normosol-R, Normal Saline, or Hextend; if Hextend is used, no more than 20 mL/kg (500-800 mL) should be given, followed by Lactated Ringer’s or normal saline as needed.
- Initial IV/IO fluid rate is calculated as %TBSA x 10 ml/hr.
- If hemorrhagic shock is also present, resuscitation for hemorrhagic shock takes precedence over resuscitation for burn shock. Administer IV/IO fluids per the guidelines in section 6.
- Analgesia in accordance with guidelines in section 10 may be administered to treat burn pain.
- Prehospital antibiotic therapy is not indicated solely for burns, but antibiotics should be given per the guidelines in section 11 if indicated to prevent infection in penetrating wounds.
- All K9TCCC interventions can be performed on or through burned skin in a burn casualty.
- Burn patients are particularly susceptible to hypothermia. Extra emphasis should be placed on barrier heat loss prevention methods.
15. Splint Fractures and Recheck Pulses
- IMPORTANT: Handle an injured canine with a fracture with extreme care and proper restraint and muzzling, if appropriate. Consider sedation and analgesia before manipulating the fractured site (see section 10).
- SAM splints and spoon splints can be applied below the knee or below the elbow. Ensure sufficient padding is in place along pressure points when applying these splints to minimize the risk of further injuries.
Figure 35. Apply 1" medical adhesive tape stirrups to the inside and outside (or top and bottom) of the foot.
The ends of the tape should extend 4-6 inches beyond the toes.
Place a tongue depressor between the sticky sides of the tape so that the tape doesn’t stick to other bandaging material.
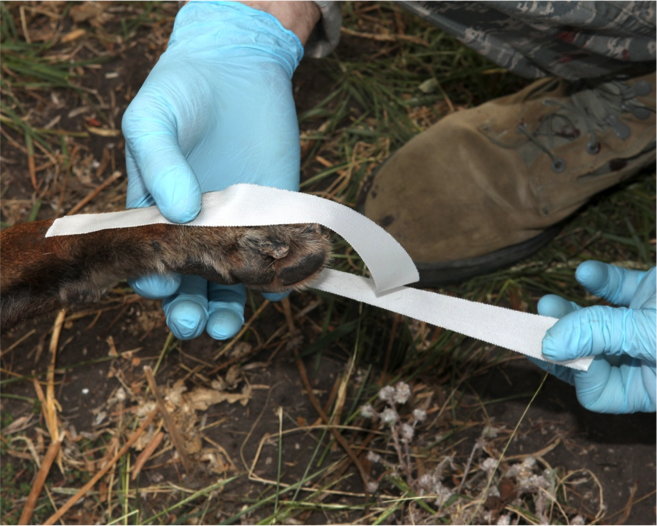
Figure 35. Apply 1" medical adhesive tape stirrups to the inside and outside of the foot
Figure 36. Wrap cast padding around the limb, starting at the toes and past the joint above the fracture
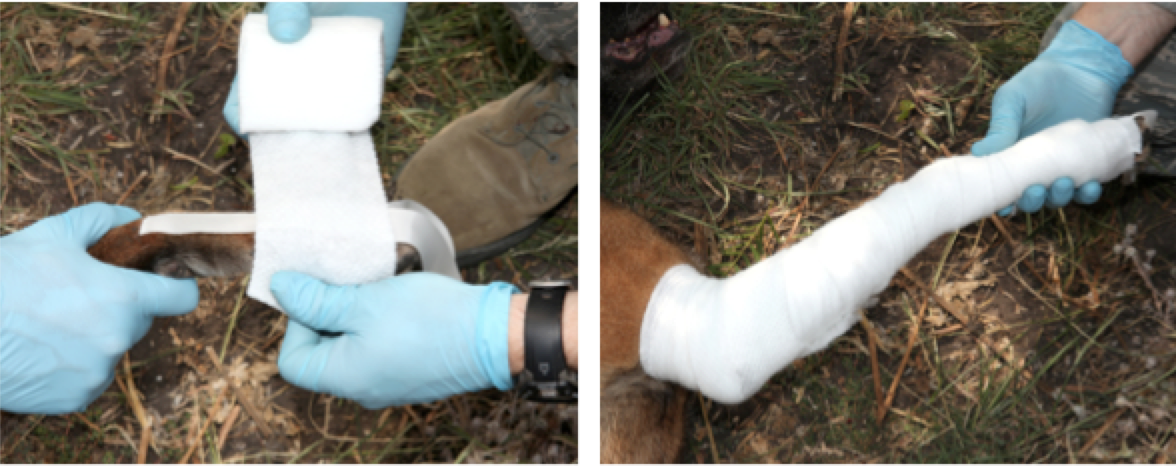
Figure 36. Wrap cast padding around the limb
Figure 37. Mold universal splint to outside portion of the fractured limb.
Center the splint over the fracture site.
Long aspect of the splint oriented along long aspect of the limb.
Mold the splint as best as possible to increase stability.
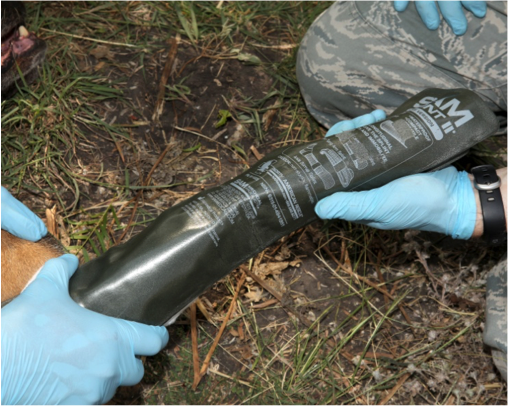
Figure 37. Mold universal splint to outside portion of the fractured limb
Figure 38. Wrap gauze bandage tape around splint
Wrap from the toes, up the limb. Wrap snugly but not so tight as to cut off circulation.
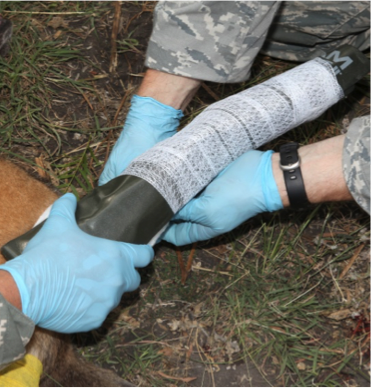
Figure 38. Wrap gauze bandage tape around splint
Figure 39. Remove the tape stirrups from the tongue depressor, twist 1/2 turn, and stick to the bandage material on each side of the paw
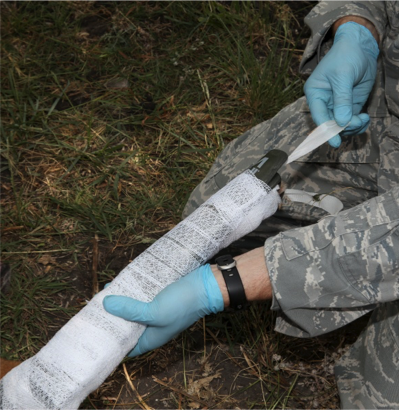
Figure 39. Position tape stirrups
Figure 40. Wrap Elastikon /Coban tape around the gauze bandage
Wrap from the toes, up the limb. Wrap snugly but not so tight as to cut off circulation.
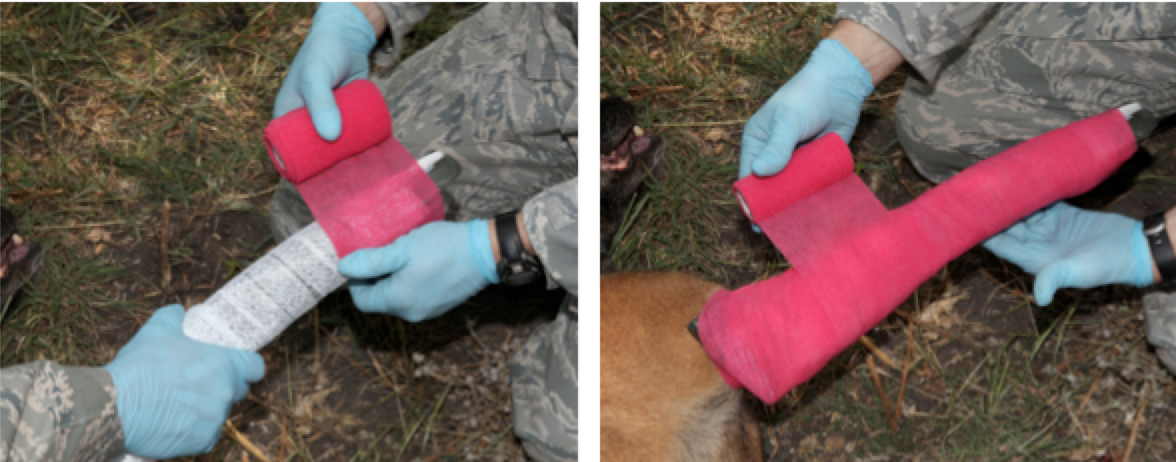
Figure 40. Wrap Elastikon /Coban tape around the gauze bandage
Figure 41. Write the date and time of the bandage on a piece of white medical adhesive tape
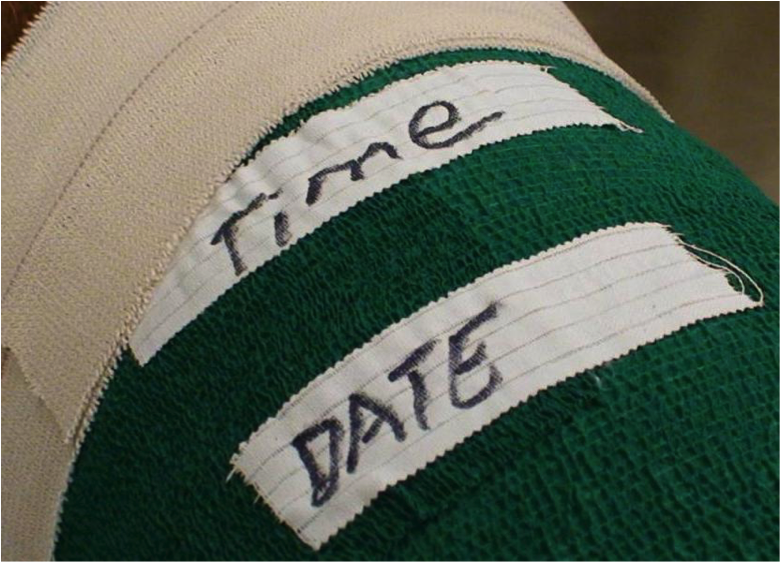
Figure 41. Write the date and time of the bandage
16. Communication
- Communicate consistently with the canine handler or assigned escort. Explain care provided and request support required for canine management and positioning. Handler and canine should travel together whenever feasible to facilitate handling and comfort of the MWD.
- Communicate with tactical leadership as soon as possible and as needed during the treatment process. Provide leadership with casualty status on a regular basis and evacuation requirements to assist with coordination of evacuation and dedication of on- site support assets. Include canine handler or escort in evacuation planning for casualty management.
- Communicate with the established evacuation system for that specific locale to arrange TACEVAC. Provide mechanism of injury, injuries sustained, identified signs/symptoms, current status, and treatments/medications administered to medical providers on evacuation platform. Ensure receiving medical providers are aware of the need to have canine Handler or assigned escort accompany the casualty for management.
- K9TCCC recommends the use of S-MIST reporting for MWD casualties. The MIST report is not a formal part of the US Standard MEDVAC request. It is supplemental to a MEDEVAC request and should be sent as soon as possible, but should not delay the MEDEVAC mission. The MIST report is also a verbal exchange between the current provider and the next level of care. For example, when a ground medic hands a patient off to a flight medic, he gives the MIST report along with the TCCC/canine TCCC card.
- S-MIST is a simple yet thorough and efficient way to convey the salient details of a patient’s status. Stated another way, it is a succinct format to communicate the status and treatment performed so the next Role of care knows what they need to know for immediate treatment.
- S-MIST Report:
- S- Stable or Unstable
- M – Mechanism of Injury: A brief description of the MOI and time of injury (if known).
- I – Injury or Illness: A brief description of the injuries sustained starting with the most serious first. Highlight life-threatening injuries.
- S – Symptoms and Vital Signs: A – Airway Status, B – Breathing Rate, C – Pulse Rate, D – Conscious/Unconscious, E – Other signs.
- T – Treatment given: Treatments rendered, medications given.
17. Cardiopulmonary Resuscitation (CPR)
- CPR within a tactical or high-threat environment for victims of blast or penetrating trauma who have no pulse, no ventilations, and no other signs of life is not often successful.
- Bilateral needle decompression (See section 3) for MWDs suffering torso or polytrauma with no respirations or pulse should be performed to verify that tension pneumothorax is not the cause of cardiac arrest. This should be completed prior to determining if CPR should be initiated or continued.
18. Documentation of Care
- Complete the Canine Tactical Combat Casualty Care Card. Request general information from Handler or assigned escort. Document evacuation category, evacuation type, mechanism of injury, treatments, and medications administered.
- Update the signs and vital parameters every five minutes for critical/unstable MWD casualties an every 15 minutes for stable, non-critical canine casualties.
- Document any additional information that would be beneficial for higher level of care under NOTES portion.
The fillable electronic cTCCC care and instructions are available at:
https://www.esd.whs.mil/Portals/54/Documents/DD/forms/dd/dd3073.pdf
![DD 3073 Canine Tactical Combat Casualty Care Card (cTCCC) [page 1]](https://mal.in.ua/wp-content/uploads/2023/09/Знімок-екрана-2023-09-11-о-17.39.01.png)
DD 3073 Canine Tactical Combat Casualty Care Card (cTCCC) [page 1]
![DD 3073 Canine Tactical Combat Casualty Care Card (cTCCC) [page 2]](https://mal.in.ua/wp-content/uploads/2023/09/Знімок-екрана-2023-09-11-о-17.39.19.png)
DD 3073 Canine Tactical Combat Casualty Care Card (cTCCC) [page 2]
![DD 3073 Canine Tactical Combat Casualty Care Card (cTCCC) Instructions [page 1]](https://mal.in.ua/wp-content/uploads/2023/09/Знімок-екрана-2023-09-11-о-18.34.06.png)
DD 3073 Canine Tactical Combat Casualty Care Card (cTCCC) Instructions [page 1]
![DD 3073 Canine Tactical Combat Casualty Care Card (cTCCC) Instructions [page 2]](https://mal.in.ua/wp-content/uploads/2023/09/Знімок-екрана-2023-09-11-о-18.34.13.png)
DD 3073 Canine Tactical Combat Casualty Care Card (cTCCC) Instructions [page 2]
![DD 3073 Canine Tactical Combat Casualty Care Card (cTCCC) Instructions [page 3]](https://mal.in.ua/wp-content/uploads/2023/09/Знімок-екрана-2023-09-11-о-18.34.34.png)
DD 3073 Canine Tactical Combat Casualty Care Card (cTCCC) Instructions [page 3]
19. Prepare Casualty for Evacuation
- Complete and secure the canine TCCC Card to the MWD. If available, use Canine Deployment Medical Card for missing information.
- Secure Canine Deployment Medical Card to canine.
- Verify placement and efficacy of all interventions.
- Secure all loose ends of bandages and wraps.
- Secure litter straps based on configuration requirements if applicable. Consider padding for extended evacuations.
- Stage casualty for evacuation based on unit standard operating procedures.
- Position canine handler or assigned escort at the head of the MWD.
- Protect artificial airway, if present, from excessive wind, dirt, foreign objects.
- Maintain security at the evacuation point in accordance with unit standard operating procedures.
- Transport injured MWD requiring emergent surgery to the closest surgical team regardless if there is a veterinary team at that location.

Download PDF of K9TCCC Guidelines